The Aim of this blog is to have one repository of user reviews of the gadgets used by them.

Show your support by becoming a follower of this blog.
If you wish to share your review of your device, just send in the abstract to: techenrepot@gmail.com
and then you will be added as a co-author after which you can post any number of reviews or write ups.


Monday, May 24, 2010

4 Ways to increase battery backup in Android devices


In this post I will discuss some of the ways in which you can increase your battery backup in the devices running Android v1.5. However most of the features are applicable across different higher versions. All these tips are from the software point of view i.e the OS. However there is more to prolong your battery backup. Do check the post on Battery Conditioning to know more.

Warning: I don’t take any responsibility if you brick your phone while doing this.

1)Screen brightness, sounds / vibrations :

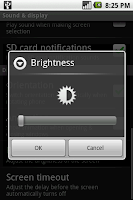
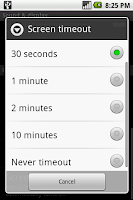
As can be seen from the Touch Screen phones post, the display is the one, which utilizes your battery the most. So it is highly essential that we supervise its usage. The screen brightness can be reduced when indoor, which can be very effective. Other than that we can also set a timeout for the screen so that whenever the screen is idle, the screen automatically gets locked.


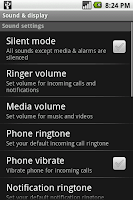
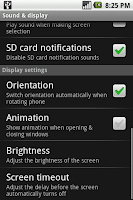
To achieve this maneuver to Settings->Sound & Display->Brightness. From there reduce the screen brightness. You can also set the screen timeout at the same place (sound & Display) as well as some additional options such as Phone vibration, Audible touch-tones and Audible Selections, which can be unchecked to disable.

2)Task Killer:

Android as you know is multi tasking which means many activities can be run simultaneously. You can always view the recently run program by long pressing the home button. But whenever you navigate away from a task it is not closed and it still remains in memory. Take for example you open a browser, and then navigate away by the cancel or the back button, the browser still runs in the memory and is not closed. To ensure that unnecessary applications are closed a Task Killer is mandatory. This will ensure that all the unwanted process running in the background which u never knew was running and those sucking your battery gets killed. To know more on Task killer check this post Essential android applications.

3)Disable Internet connectivity.


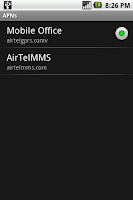
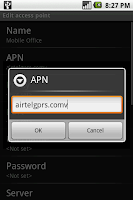
The important pillar of android is that it lets you customize your device with thousands of applications from the Android market. But most of the applications connect to internet for remote processing or at-least for ads which u never want it to. There are many applications such as juice defender which allows you to turn off your internet when not in use. But you can also manually do it by changing the APN name from your settings.


To achieve this maneuver to Settings->Wireless Controls->Mobile Networks->Access Point Names. From there select your service and change the APN name. And whenever you wish to use the internet you may replace back with the original APN name.

4) Aero Plane Mode:


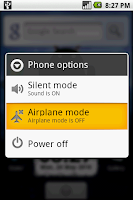
Network services are the programs that run constantly and probe for the availability of signal in your area there by sucking your battery considerably. Most of the people leave the phone switched on or at least in silent mode during night. And all those hours these services probe for signal strength and utilize the battery. By switching to the Aero Plane mode all these services are put to sleep. Of coarse you don’t want to do this on day time especially when you are waiting the call from the special one. This method is useful for those who don’t want to lift calls in the night but yet would like to use the phone as an alarm.


This is achieved by long pressing the end call/power button and from there select the Aero Plane mode.Always turn off Bluetooth, wifi or any other services when not in use. These are monstrous services which suck your battery.

As said all these options are done from the software part. you can do a lot more by properly maintaining your battery by conditioning it. Check the post Conditioning Battery for more.

Saturday, May 22, 2010

Conditioning batteries

We spend days and months to figure out the best gadget that meets the requirement and fits the budget constraints. And once done we are happy to have one and get carried away. There is one more important thing to note for those researchers: Battery conditioning. Batteries have become so important that when you purchase a mobile gadget we look for the best back up but most of the times we fail to condition it accordingly to prolong battery life as well as backup.

So in this article I will throw some light on some terminologies and efforts required to increase your battery life. Since most of the gadgets now rely on Lithium-Ion batteries I will restrict my discussions to the aforementioned though a little bit comparisons here and there with Nickel batteries.


Battery ratings:


The storage capacity (charge) or the time that a battery lasts is mentioned in terms of mAh. mAh is an abbreviation for milli-ampere hours, which are units of electrical charge. Larger values, for batteries of the same battery voltage, indicate that the battery has a larger capacity and will power your phone for a longer period of time before charging. The mAh ratings range from 700 mAh to upto 1800 mAh for mobile phones.


Do not get carried away by the mAh ratings. The ratings and the software running on the phone are interdependent. If the software consumes more battery then the promised ratings cannot be accomplished. Now all my discussions will be pointing to mobile phones, however the charging method remains the same for all the Lithium-Ion based gadgets.


Threshold levels:


Lithium-Ion batteries have two levels i.e. say for example if the battery can store 100% charges only 90% of it is available for charging. So when you over charge a Lithium-Ion battery, the protective internal circuits in the battery simply stops it from charging. In a similar manner when your battery is having only 10% of charge left the software in the mobile simply instructs you to plug in for charging. The left over 10% can be utilized by the software in the mobile to run the clock (time) something similar to CMOS batteries, which helps you run the clock in PCs. So this is an organized and efficient way of battery usage as compared to the Nickel based batteries.


First time charge:


Lithium-ion is a very clean system and does not need priming as nickel-based batteries do. Priming is a procedure in which your battery is trained to or initialized to hold charges. If careful priming is not done to the Nickel based batteries then battery back up will be lower than what its ratings state. Here in Lithium-Ion batteries the 1st charge is no different to the 5th or the 50th charge, which is evident from the thresholds level section. Most of the Lithium-Ion batteries take upto 3 – 4 hrs for a full charge from zero. So there is no point in charging the Lithium-Ion batteries for 8 hrs and more for a first time charge. Always stick to the manual of the product and they clearly mention the duration your battery requires to get fully charged.


Subsequent charging:


In order to prolong your battery life, the Lithium-Ion battery should always be operated with 70% of charge. The reason is, when the batteries are continuously charged to their 100%, the probability of cells getting damaged is high as a result of which the lifetime of the battery gets reduced. So it is always advised to maintain charge in the 70% of charge limit. However, frequent charges in this pattern could lead to malfunction of the gauge that gives you the battery level indication. To avoid this you can do a brief topping charge every 20 days where you can charge from 0 to 100% battery life.


Storage:

If you are not going to use your battery, then the first thing you need to do is to remove the battery from the device and store it in a cool place around 20 – 27 degree Celsius. The battery should neither be with full charge nor without charge. It has to be around 40% to 50% and should be charged at least once in 40 days to make sure that the battery cells don’t die.


Software control on batteries:


Most of the smart phones instruct you to charge when the 10 % limit is reached such as the symbians, windows, Linux, the androids etc. However there are lots of feature phones that run on their proprietary softwares of the manufacturers of which quite a few fail to convey this message and continue to use the remaining charge until it is drained. Continuous draining of charges will also cause the cells to damage. Similarly over charging can also damage the cells in the battery though we have the protective internal circuitry. As a rule of thumb do not drain nor overcharge.


Summary:


As we saw Lithium-ion is a very clean system and does not need priming as nickel-based batteries do. The 1st charge is no different to the 5th or the 50th charge. So the instructions from the shopkeeper to charge the battery for 8 hours or more for the first time may be leftover from the nickel battery days. So here are the key things that you need to follow to get better battery backup and battery life:


  • Do not overcharge.
  • Do not drain the battery.
  • Always try to maintain the battery charge level in the 70% range.
  • For every 20 days do a topping charge by charging your battery from zero to full to avoid battery gauge mal function due to previous step.
  • Always use the chargers from the respective manufactures and if not, the battery cell can be easily damaged if charged with 3rd party chargers.
  • If the battery is not used, disconnect from the device and store it in a cool place with 40 –50% charge in it. Charge that battery once in 40 days.

I hope this would have given you a good idea on how to maintain your battery. If you are keen to know from the technical aspects of Lithium-Ion batteries you can check here.

Tuesday, May 18, 2010

Leads#1: Budget Android Phones in India

UPDATE(1 October 2010):: The latest revision of Budget android phones can be found here.

It’s been nearly 3 weeks since the blog was started and the response is pretty impressive (you can check all the stats here). Thanks to all the readers for visiting this blog and do visit in future also to get to know more about gadgets reviews and tips & tricks. I extend a warm greeting to all of you to come out with reviews of your gadgets, which sure will be helpful to all the other readers.

And now I would like to introduce a new section in this blog called leads which basically wont cover any reviews but will lead you to various options available in the market to whatever gadget you are looking for. To start with I decided to go with android phones also called as Droids as the heat of android is there all over this blog (the poll results speaks for itself).

When the android OS was released, leading manufacturers came out with devices with impressive specifications which meant it will be costly and buying them would be a dream altogether. Capacitive screen, camera, 3G,Wifi, GPS receiver and android packed together into a gadget will set you back to 30k and plus. And many times it-raised questions like Android is Open Source and still the device cost wasn’t affordable to many. And this year saw the release of handful of devices aimed at the lower segment with more such devices coming up at the end of 2010.

Before you zero on to a droid there are few things you must consider. As posted in the “Android OS V 1.5 Cup Cake review”, one top priority of Android is to create an upgradeable system. This means you buy the hardware in the form of a phone with an OS with which you will get lifetime updates. So you enjoy new features every time a new version of Android comes out which is absolutely free. For this to happen you should buy a phone that can handle the future updates of the OS like say for example good memory and processing ability. And most importantly a manufacturer who is willing to give updates to the device.


So in this post I will cover some of the Android devices available in India in Rs 12,000 to Rs 16,000 range.

1)HTC Wildfire:


HTC is a Taiwanese company, which is very well known for its smart phones. This firm developed the first google phone called the G1 to the new google phone called the Nexus One. HTC have announced the new phone: Wildfire aiming the mass market. This phones build is pretty similar to the Google Nexus One and the HTC Desire phone. Here are the specifications:


·Operating system: Android 2.1 + HTC Sense User Interface
·Networks: GSM 850/900/1800/1900 MHz, EDGE/GPRS, UMTS/HSDPA 900/2100
·Processor: Qualcomm MSM7225-1, 528 МHz processor
·Internal: 512 MB + microSD (hot swappable)
·Interfaces: Wi-Fi, Bluetooth 2.1+EDR (A2DP), microUSB (USB 2.0) for charging and sync, 3.5 mm headphones jack
·Screen: TFT LCD - capacitive , 3.2” 240x320 pixels resolution (QVGA)
·Camera: 5 MPx with Auto Focus and Flash
·Other features: GPS , A-GPS, proximity sensor, light sensor, gyroscope, digital compass
·Battery: removable Li-Ion 1300 mAh

Now that is an impressive spec sheet for the lower segment completely satisfying the requirements I mentioned. The only drawback to this phone I see is the display resolution which is just QVGA (refer this post to know more about resolutions). But the impressive HTC sense user interface just makes up for that set back. This phone is announced and is expected to hit Indian market at the end of June. The estimated price of this phone in Indian Rupees is around Rs 16,000(announced for a price of 250 euros).

2) HTC Tattoo:


Another entry from HTC in this segment is HTC Tattoo. As the name indicates this phone is tattooed according to the buyers wish against available options. This phone too comes equipped with the impressive HTC Sense UI, which basically is GUI customization over the androids UI. Here is the spec sheet.

·Operating system: Android v1.6 (upgradeable to v2.1)+ HTC Sense User Interface
·Networks: GSM 850 / 900 / 1800 / 1900, EDGE/GPRS, HSDPA 900 / 2100
·Processor: Qualcomm MSM 7225 528 MHz processor
·Internal: 512 MB + microSD (hot swappable)
·Interfaces: Wi-Fi, Bluetooth 2.1+EDR (A2DP), microUSB (USB 2.0) for charging and sync, 3.5 mm headphones jack
·Screen: TFT LCD - resistive , 2.8” 240 x 320 pixels resolution (QVGA) with 65k colors.
·Camera: 3.15 MPx.
·Other features: GPS , A-GPS, proximity sensor, digital compass.
·Battery: removable Li-Ion 1100 mAh

This phone has a small display of 2.8 “ with just QVGA resolution and a camera with no auto focus and flash. It basically comes with v1.6 but can be updated to v2.1. And another let down is that the screen only supports 65k colors. This phone sells for around Rs 13,000.

3) LG GW620:


The GW620 is the first android offering from LG and is the only phone that comes with a physical slide out keyboard for the lower segment. Lets see what we have in this phone:


·Operating system: Android v1.6
·Networks: GSM 850 / 900 / 1800 / 1900, EDGE/GPRS, HSDPA 900 / 2100
·Internal Memory: 150 MB + microSD
·Interfaces: Wi-Fi, Bluetooth 2.0 +EDR (A2DP), microUSB (USB 2.0), 3.5 mm headphones jack
·Screen: TFT LCD - resistive , 3.0” 240 x 320 pixels resolution (QVGA) with 256k colors(65k active).
·Camera: 5 MPx, autofocus, LED flash.
·Other features: GPS , A-GPS, Accelerometer, digital compass,slideout keyboard,DivX Player.
·Battery: removable Li-Ion 1500 mAh

This is the only phone in the lower segment touch screen phone running Android, which has a slideout physical keyboard. This phone is also a DivX certified phone, which means you can play the conventional .avi media files. So far LG have not announced any updates for GW620. The display supports 256k but can display only 65k(as Android v1.6 supports only 65k). The phone costs around Rs 14,000.

4) Samsung Galaxy i7500:


Samsung galaxy is the phone that comes equipped with the brilliant AMOLED screen (check this post to know about AMOLED). Here are the specifications of Galaxy:


·Operating system: Android v1.5
·Networks: GSM 850 / 900 / 1800 / 1900 MHz, EDGE/GPRS, HSDPA 900/1700 /2100
·Processor: Qualcomm MSM7200A 528 MHz processor
·Internal memory: 8 GB + microSD (hot swappable)
·Interfaces: Wi-Fi, Bluetooth 2.0+EDR (A2DP), microUSB (USB 2.0), 3.5 mm headphones jack
·Screen: AMOLED - capacitive, 3.2” 320 x 480 pixels resolution (HVGA), 16M colors (65K effective)
·Camera: 5 MPx with Auto Focus and LED Flash
·Other features: GPS, A-GPS.
·Battery: removable Li-Ion 1500 mAh

Now this phones spec sheet is very impressive with the brilliant AMOLED screen, 5MPx auto focus camera with LED flash. But all these features gel well only with Android v2.1+, take for example the brilliant AMOLED capable of 16M colors but can deliver only 65k with v1.5. Unfortunately Samsung have not announced an update for this device and not sure if there will be an update in future. If there is an update then this phone will be a killer buy for its hardware spec sheet. The phone costs around Rs 15,000.

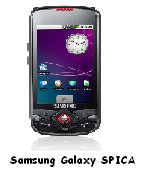
5)Samsung Galaxy Spica i5700:


There’s another offering from Samsung called the Galaxy SPICA which is the striped down version of the Galaxy. Here is the spec sheet:


·Operating system: Android v1.5 upgradeable to v2.1
·Networks: GSM 850 / 900 / 1800 / 1900 MHz, EDGE/GPRS, HSDPA 900/2100
·Processor: Samsung 800MHz processor
·Internal memory: 180 MB + microSD (hot swappable)
·Interfaces: Wi-Fi, Bluetooth 2.1+EDR (A2DP), microUSB (USB 2.0), 3.5 mm headphones jack
·Screen: TFT LCD - capacitive, 3.2” 320 x 480 pixels resolution (HVGA), 16M colors (65K effective)
·Camera: 3.15 MPx with Auto Focus.
·Other features: GPS, A-GPS, Accelerometer, Digital Compass, DivX player.
·Battery: removable Li-Ion 1500 mAh


As the above specifications say it’s a big let down on the imaging front with no flash. And like Galaxy, SPICA has a 16M screen but only 65k is effective as it runs Android v1.5. But Samsung has announced an update to v2.1 and also comes pre installed with V2.1 with recent packages. This is also a DivX certified phone. The phone sells for around Rs 12,500.You can read the review of this phone in this post.


Leads:

The Samsung Galaxy and Galaxy SPICA where introduced during November 2009 and were priced more than Rs 20,000. At the same time HTC introduced the Tattoo for around Rs 16,000. That was the time when Samsung made their pricing policy aggressive and decided to bring down the cost of SPICA to Rs 12,500 and Galaxy to Rs 15,000.And then LG wanted to catch up this low budget game with their slide out mobile GW620 making the competition even more tight. This battle has brought more options for the lower segment and made touch screen phones running Android a viable option.

Now we have seen 5 affordable devices to choose from, ranging from a device having a slideout keyboard to a DivX certified phone. On paper the yet to be released HTC WildFire and SPICA look interesting and are the only phones to come with the now stable Android v2.1 loaded with lots of features. These are different options to look for but we do not know how these devices perform in reality though we have reviewed SPICA recently, which is pretty impressive. The SPICA with an impressive hardware spec is a killer buy for its price. Check out the review and judge for yourself.

And for those who can wait a little longer here is good news though unconfirmed. Samsung is coming up with two more low end phones namely Samsung i5801 termed Galaxy 3 which is the successor of SPICA having AMOLED Capacitive screen and Samsung i5500 which is rumored to be a Corby series phone running Android. Both these phones have Android v2.1 running.

So if you are looking for an Android v2.1 rich in Features then the leads here is to HTC Wildfire,HTC Tattoo or Samssung Galaxy SPICA.

To know more on the above devices visit GSMArena.com for comprehensive reviews.


UPDATE(1 October 2010):: The latest revision of Budget android phones can be found here.

Sunday, May 16, 2010

Essential Android Applications


In the Android Cup Cake review I had mentioned that there are some areas in which Android did not live up to simple basic things like missed call alerts (though it gives a notification). But customization is Androids top priority. This is achieved through the hundreds of free applications available in the Android Market. I will cover some of the applications that will eliminate the couple of grey areas in Android 1.5 . There are lots of related applications in these categories. Many of them rely on Internet connection where all the processing is done in a far away server. And some applications come with lots of adds which might eat your resources pretty badly. So I have covered those applications that simply perform their intended task pretty neatly without connecting to you Internet.
This is not the review of application but a list of applications that will in fill your needs.
In this post I will also discuss memory management in Android.


1) Advanced Task Killer:

One thing to notice in the Android is there are applications which run in the background sucking your battery and especially when connected to Internet. This can seriously slow your Droid’s performance and decrease the battery backup quickly. The easy fix is Advanced Task Killer: just launch it, hit the big Kill button at the top of the list of running programs and everything non-essential is turned off, including itself.


You can remove programs from the kill list if you so desire, which means any program say for example G mail is trying to synchronizes, you may opt to kill it.

2)Documents to Go:


Most of the Android phones (nick named droids J) do not come with an office application to view/edit Microsoft office files like word, PPT etc. Documents to Go is the application that does this job pretty neat though you will be able to only view word and spread sheets.


You need to purchase the full version to edit these documents. The paid version also comes up with support for view/edit all Microsoft Office documents and view PDF files.

3)Missed Reminder:

As I had mentioned earlier in the review post of Android Cup Cake, there is no option inbuilt to notify the missed events such as calls, sms or mails. Only way was through the notification area. Missed reminder is a nifty tool, which will notify you of all the missed events through beep, vibration or LED glow.


Some of the options for notifying are: blink LED (if your phone comes with an LED flash), notification intervals, number of repeats for notification, popup options and vibrations. The events that are covered includes: SMS, MMS, Calls and Gmails. You can make this application run at start up so that you need not manually run this application every time you switch off and switch on your phone.

4)Note Everything:

This is an application where you can create text-, voice- and paint-notes and view simple text files. Your notes can be organized in folders. You can create shortcuts on home, send notes, use live folders & much more!


Pro version (paid version) add-on adds more features to Note Everything such as: Photo notes, Checklists, Durable checklists, Reminder, Encryption (password protection), Stick notes to status bar, Full backup to SD-card, Imports your Palm/Outlook Memos.


5)OI file manager:

The stock Android Cup Cake does not come with a file explorer/manager though the gallery can be used to view multimedia files. Open Intents file manager lets you access all the files on your phone or from the memory card, and allows you to copy, paste or delete them. You can do the same with filled folders too. This is very handy, as uninstalling an app often leaves associated temporary files on your phone taking up valuable space.


With OI you can simply remove the entire redundant program folder. OI also integrates with Google mail allowing you to send just about any file directly as an attachment.

6) NodEcon:


This is a budget/expense-tracking tool. With this you can set a budget for a particular period, create categories where you spend the money and view the status with a good bar chart or graph that summarizes your daily expenses.


Customizations include: budget begin date, budget type, monthly budget amount, expense chart type and login password. You can also backup your expenses to your memory card.

7) Pic Say:


Pic say is a photo editor tool with which you can color-correct your pictures and add word balloons, titles, graphics, and effects like distortion, spotlight, marker, pixelize, exposure, contrast, colorize and many more. This comes with an all in a fun, intuitive, and easy-to-use interface.


8)Digi Clock:

This is a digital clock that can spice up your droid’s desktop. Other than a good digital look it can also set up alarm where you can customize the ring tones.


It also has options to activate alarm even when your phone is in silent mode.


Memory Management:


Memory management is always important because the applications installed may use up some space and its always vital to have thorough check on its usage. For example a
youtube application can be used to view videos, which takes up space to store the streamed video.So its always important to have a check on its usage and free the space then and there to make sure that your application does not eat up your resources.


Maneuver to Settings->Applications->Manage Applications. This will list all the applications installed and used in your phone. Selecting an application will tell you how much memory it has used. You can release that memory by simply selecting clear cache or clear data whichever is applicable. Applications can also be uninstalled from this space.

Friday, May 14, 2010

Touch Screen Phones


There was a time when we looked up @ a person having a touch screen gadget like multi-millionaire. But things are totally different now. Thanks to LG and Samsung who made this technology reach the lower middle phone segment. Now with lots of touch screen phones around costing little more than 6k, there sure is confusion to choose from.

So in this article I will discuss some of the technologies and terminologies that will help you choose the right touch screen phone according to your requirement.

Touch Screen Types:

Touch screens can be broadly classified as Resistive and Capacitive screens. Each of these technologies has their own pros, cons and purposes. Lets check out how they differ.


Capacitive Touch Screens: The capacitive touch screen is made up of a glass panel that is coated with a material. The property of this material is that it can store electrical charge. So the capacitive touch screens basically stores electrical charge. The human body is a good source for charges to flow. So, when you touch this screen with your finger, some of these charges on the screen get transferred to your finger. The oscillator circuits in the phone will then sense this decrease in the charge on touch screen and the exact location where the touch occurred. And then finally it transfers this specified information to the touch screen driver software, which takes care of the rest.

Pros:
+Highly sensitive to finger touch.
+Multi touch.
+Good sunlight legibility.
Cons:
-Requires little humidity to function smoothly.
-Does not function with objects such as stylus, gloves or even nails.
-It is comparatively costly.

Resistive Touch Screens: Resistive touch screen, on the other hand is again made up of normal glass panel. However, this glass panel in this case is coated with three layers. Two of these layers being conductive and resistive are kept apart using spacers while the third scratch-resistant layer covers the whole setup. When the resistive touch screen system is running, current flows through these layers. On a finger touch, the two layers get connected and change in electrical field occurs. The system calculates the coordinates of point of contact and passes them to touch screen driver software, which takes care of the rest.

Pros:
+Works with any object stylus, pen, nail etc.
+Independent on humidity factor.
+Relatively cheaper

Cons:
-No multi touch support.
-If used with a finger, requires a little bit of pressure to recognize the touch.
-Poor sun light legibility.
-More vulnerable to dust and scratches.


Now that leaves us to choose the technology based on our requirements. If you are going to use hand writing recognition tools (screens are very responsive to stylus) then resistive screens are the best ones for you but remember you will have hard time typing in your hand. On the other hand if you want a device to be very much responsive and you don’t want to use any external objects, then capacitive screens are the ones to go for. As said there is considerable difference in touch sensitivity with capacitive screens beating the resistive screens.

Display types:


TFT LCD/OLED-AMOLED and Super-AMOLED are some of the displays used in mobile phones. Lets have a look at each of the technologies.

TFT LCD (Thin Film Transistor Liquid Crystal Display): This technology uses liquid crystals that have direct driven image elements on which voltage is applied and varied to accomplish different color elements. In addition it uses a back lighting arrangements to illuminate each color element.

Pros:
+ Oldest reliable technology.
Cons:
-Very bad sunlight legibility/ viewing angle.

OLED-AMOLED (Organic Light Emitting Diode/Active Matrix OLED): As the name indicates it uses LED’s to accomplish the task. AMOLED utilizes the Active Matrix addressing with the OLED technology. They are self-illuminating and do not require back lighting. Thus it reduces one more layer on the screen and making it thin. Each of the pixels is self-illuminating thus consuming less battery.

Pros:
+ Less power consumption (since it does not require back lighting).
+ Sharp display with superior brightness, contrast and viewing angle.
+ Faster color switching, reducing ghosting or blurring effects in fast moving graphics, such as action movies or fast moving games.

Cons:
- Poor sun light visibility.
- It is costly.

Here is a good comparison between TFT LCD & AMOLED.

Brightness comparison:


Response time and blurring effects on fast moving objects:


Super AMOLED: Is there a technology that would wipe out the cons of AMOLED? Thanks to Samsung for the Super AMOLED technology, which almost completely eliminates the cons of AMOLED, but for the price tag. Lets hope the cost also comes down. The only change here is that instead of having a separate glass for touch sensor as used in TFT LCD and AMOLED, the AMOLED screen will itself handle the sensor. The following pictures were taken from Mobile World Congress 2010 covered by mobilereview.com, reveals the technology.


Check out the video where Samsung explains its Super AMOLED technology against TFT LCD and AMOLED technologies:

http://www.youtube.com/watch?v=aQkLMG3SBQ4

Here goes the advantages of this technology.
Pros:
+ 20% brighter screen.
+ 80% less sunlight reflection which means good sunlight legibility.
+ 20% more battery life.


Now when we talk about touch screens the first thing that comes to our mind is the iPhone. Now here is the screen comparison between the iPhone (TFT LCD capacitive screen) and Samsung Wave (Super AMOLED with capacitive screen), which is the first phone to have a Super AMOLED screen.


picture source:gsmarena.com

Now this video will sum up as to what to expect from a Super AMOLED screen:
http://www.youtube.com/watch?v=lRkb75gjVD0

Display Resolution: It simply means the physical number of columns and rows of pixels creating the display. More the number of pixels better is the clarity of the display. VGA (Visual Graphics Array) is a standard way of measuring the resolution. VGA refers to a resolution of 640x480. Most of the low-end phones nowadays come with a 2.2” QVGA resolution, which is nothing but Quarter of VGA or a WQVGA. The table will give you an overview of the various display resolutions:


Conclusion:

The Super AMOLED touch screens are a wonderful piece of technology to own. On the other hand TFT LCD’s are tried and tested and one of the most reliable in this front. At the end of the day, no matter how many technologies come up, it all depends on ones requirement and affordability. I hope this article helps you choose the right touch screen phone that meets your requirement and on your budget. Here are some of the phones, with resistive screens:(in the 6k to 15k range)


Here are some of the Capacitive touch screen phones:(in the 9k to 15k range)