The Aim of this blog is to have one repository of user reviews of the gadgets used by them.

Show your support by becoming a follower of this blog.
If you wish to share your review of your device, just send in the abstract to: techenrepot@gmail.com
and then you will be added as a co-author after which you can post any number of reviews or write ups.


Tuesday, June 8, 2010

Android Phone USB Tethering


Well as promised in the earlier post, I will discuss on how to convert your Android phone as a modem and browse from your PC in this post. There are handfuls of applications available for achieving USB tethering. However I had picked two methods one for M$ Windows and the other for Linux, which were little straight forward. Again you need not have to root your phone to achieve USB tethering. Lets get started with Windows:
For Windows(7/XP/Vista):

To do USB tethering in windows you need the tool called pdanet. Go to this site and download the installation file. The installation is pretty much straight forward.


Pre requests:

1) Drivers for your phone (Usually available with applications CD that comes along with the phone).
2) Pda net from this site.

*Note: If even after all the following steps your android mobile is not detected, try installing the android phones device drivers and then install pda net.

Step 1:

Install the Pda net application in your system. Do not connect your Android phone to the PC unless the pdanet application on your pc asks you to connect it. During the installation process, if everything went well, a message will be displayed as shown:


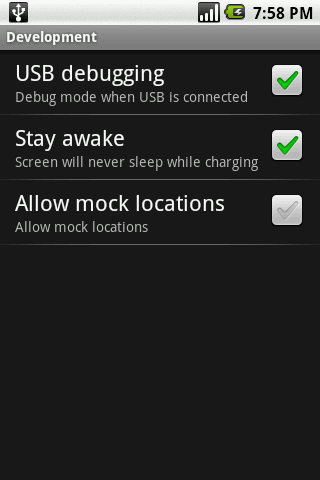
Follow the instructions in the message i.e connect your Phone with the following settings enabled: settings->applications->development and enable USB debugging. You should also enable installation of applications from unknown source by traversing to settings->applications and then enable the unknown source.

If this step is completed successfully then you should see the pdanet application in your android phone.

Step2:


From your phone run the pdanet application and select enable USB Tether. Now from your pc right click the pdanet icon in the start up list and select connect. The pdanet application can be seen running on your startup list. If not manually start the pdanet application. Congratulation, your Internet connection has been set up.

So everytime you want to tether your Android phone, make sure that the USB debugging option is enabled on your phone and then connect it to your computer.Launch the pdanet application in your mobile. Finally launch the pdanet application from your windows PC and establish a connection from there.


While disconnecting, make sure that you turn off USB tethering from your mobile first and then on your PC.

For Linux(Ubuntu):

In Linux, USB tethering is achieved using the azilink tool.
Pre-requests:
1)Android sdk for linux which can be found here.
2)Openvpn 2.1 (you can download from the launchpad here).
3)azilink and azilink.opn file(check out them here).

There already is a detailed post on how to achieve USB tethering here. This post will help you set up the USB tethering in Ubuntu. However in step number 4 of that post, while setting up rules files for your device, you may replace the ATTRS{idVendor} with the following code whichever is applicable:


*source of the above information.

The following posts may be of interest to you:

To know whats there more in this blog check here.

Want to sync your contacts from/to PC and your Android Phone??? Watch this space for the solution. If this post helped you, you can show your support by buzzing this post to your friends, becoming a follower or Join hands to publish your own review/posts.

Thursday, June 3, 2010

Installing apk Files Offline on Android Devices


The DROIDS nowadays happens to be the most happening device. The rate at which the number of applications that is increasing in the Android market speaks for itself. But there are people who don’t go for an Internet connection and thus cannot enjoy these applications, which takes your DROID to a different level. Don’t worry; there is a work around here to install these applications offline. In this post I will discuss how to install .apk (Android Application installation file) files in your DROID offline. I dont take any responsibility if you brick your phone in the process.

There are two cases:

CASE 1: If you already have a file manager then the task is very simple.


Maneuver to Settings->Applications and check the unknown source. This basically will allow you to install applications offline from 3rd party websites (mind you these applications are not authorized by Google, so there is no guarantee of its behavior). Then browse from your file manager to the specified folder and long press the .apk file. Voila your application is installed. A file manager is something like an explorer in windows, which allows you to browse through your files/folders in the SD card.

CASE 2:You have just now brought a brand new DROID and it doesn’t have a file manager.

In this method we will be using the Android SDK (Software Development Kit) to install files in your DROID. Follow the steps below one by one:

Note: Do not connect your phone to the PC unless it is specified in the following steps.

Step 1:

Download the Android SDK and install it in your PC. You can follow this link, which clearly explains all the steps including the download link of the SDK. You may however need to follow just the first 3 steps provided in the link.

Step 2:

Next you have to install the drivers of your Phone in the PC. Most of the manufacturers provide a CD with applications along with the Phone, which contains the drivers for the phones. Follow the instructions provided in the CD and install the drivers.

Step 3:


Now in your Phone (DROID), traverse to Settings->Applications->Development and enable (check) the USB debugging options. Once done, connect your phone via USB to the PC. If all the drivers were successfully installed then your device should be identified as a Android USB Composite device.

Step 4:

Open a Command prompt. Just issue the following command in the prompt:


adb install path/application


Where path is the path where your application is stored in the PC and application is the name of the application. Note: there is a space after adb and install. Issuing this command should start the installation procedure. And if all went successful you will get a message stating the application was successfully installed to your DROID.

First time reader of this blog? Check this post to know whats more in this blog!
Want to use your Android Phone as a modem for browsing Internet??? The solution is here. If this post helped you, you can show your support by buzzing this post to your friends, becoming a follower or Join hands to publish your own review/posts.

Tuesday, June 1, 2010

The Tech Entrepot's New Additions


Well, the past month had witnessed nearly 10 posts on various topics. We had also introduced couple of new interesting sections. The two new sections are Leads and Guides. There are few more other relevant sections, lets go one by one.

Leads:

The section Leads will help to choose from various options which includes technical specifications, market value and finally states some advantages of each gadget over the other which will clearly lead you to a right choice and that’s why its called leads.

Here are some Leads for MAY 2010:
Budget Android Phones.

Guides:

This informative section will basically introduce to various technology, its pros-cons, technical terms, market value and finally will introduce to some gadgets using those technologies. So knowing the technology before using it will be more productive and makes more sense right? So keep watching this space for more guides.

Here are some guides for MAY 2010:
Conditioning Mobile Phone batteries.
Touch Screen Phones.


Android Information:

As you can see from the posts in the month of MAY, there was more heat on Android and the DROIDs. The reason is one of the blog author owns a DROID so he quite often does experiments as a result you can expect more posts on Android :) . If you are aspiring to buy a DROID keep watching this blog there are lots more to come.

UP Next:

This section will just let the readers know the upcoming posts. Sometimes it takes a little time to actually publish the posts mentioned in the up next section due to the time constraints with each of those respective authors. But it’s assured that it will be published.

Related Videos:

Here you can view videos if any related to the posts in this blog.

HOT Gadgets:

All the gadgets that are reviewed will be put up in this section.


Most Frequently visited Posts:


If you are a first time reader or a casual blog reader then this section will let you choose the most frequently visited posts in this blog.


From the readers count, which reads nearly 1000 for just one single month is encouraging to go even little farther and publish posts on new topics. So it’s the readers who make this happen. You can always help this blog by publishing your own reviews, which in turn is going to help other readers. Just mail in your review to techenrepot@gmail.com and then you will be added as an author after which you can publish any number of posts.

If you like this blog and the idea behind this blog you can do some of the following:


Google Buzz:

On the right hand top of every post you have a buzz button, which you can click to share the post with your buzz mates. This will ensure that more readers come out and therefore many more reviewers come up which will help the seekers. So if you like the post feel free to buzz it to your friends.

You can catch The Tech Entrepot in Google Public Buzz in this link:
http://www.google.com/profiles/techenrepot#buzz


Subscriptions and sharing:

You cannot reach the blog all the time? No problem, you can just subscribe to The Tech Entrepot blog by providing your email id. A verification mail will be sent to you. Upon clicking the verification mail you will then get the posts right into your inbox. Further you can also share these posts in Tweeter as well as Face book.


Support & Suggestions:

Theres always room for improvements. If you would like to suggest any new ideas feel free to use the comments section to feed in your ideas. There are many posts in queue for this month from speakers to laptop and multimedia phones. So have an eye on this blog on all weekends for new posts. As always show your support by becoming the blog follower and well if you have a review just send an abstract to techenrepot@gmail.com and from there on you can publish any number of posts on this blog.


::Blog Admin::
Techenrepot.